
Coding Compendium
A free 100-page ebook collecting my projects and tutorials for Raspberry Pi, micro:bit, Scratch and Python. Simply join my newsletter to download it.
Discover how to play classic arcade games on your Raspberry Pi with Picade from Pimoroni
From its earliest days, one of the popular uses for a Raspberry Pi was retrogaming. The Raspberry Pi is powerful enough to run emulators for classic arcade machines, home computers, and consoles, and part of the appeal is that you can house the tiny computer inside a ZX Spectrum case or a cabinet.
Pimoroni makes an arcade cabinet called Picade that provides all the parts you need to build a desktop arcade cabinet. There's a responsive joystick, six coloured arcade cabinet buttons for the top surface, a further two buttons on the front, and three more on the side (one for power). The kit includes the cabinet frame, the Picade add-on board for connecting the controls to the Raspberry Pi, and an impressive lightweight HDMI display. You'll need to add your own Raspberry Pi, micro SD card, and power supply. There's also a set of stickers, although the textured surface of the cabinet means you can't stick the stickers onto the sides of the Picade unit.
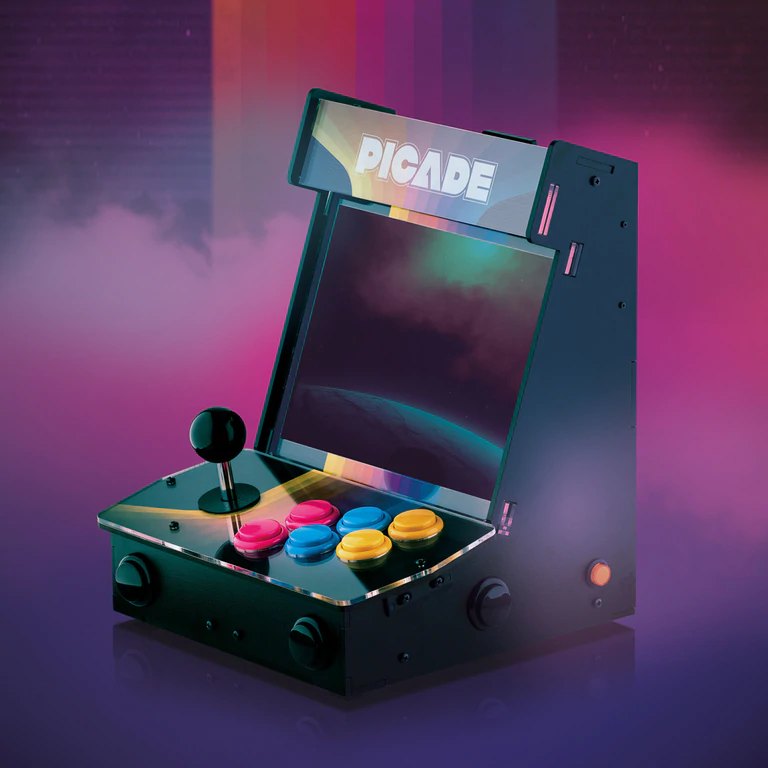
The Picade cabinet looks great on your desk! Photo courtesy of Pimoroni
I assembled the unit over a couple of sessions of two or three hours. You could probably do it in a single day, but I found I was ready for a break after a while. It's fiddly work, although it doesn't involve any soldering. It's satisfying to build, though, and the unit itself is beautifully designed. It feels like a substantial games machine, despite being much smaller and more convenient than a real upright arcade cabinet.
For games, you use the open source Retropie software. This supports a wide range of emulators, including classic home computers (such as the Amstrad CPC and ZX Spectrum), classic consoles (including the Game Boy, Nintendo 64, and PlayStation 2), and arcade machines.
My main interests are in the classic arcade machines and the home computers. Although the software is old, it's still protected by copyright, so you should be using software that you have a licence to use. Nevertheless, the easiest way to get that software is to download it, rather than try to convert your old arcade ROMs or cassette tapes yourself. The arcade games use the MAME emulator, and you'll need to find ROMs that match the version of MAME you're running. One gotcha is that some ROMs require other ROMs to run, so you might find you need to install a game you're not that fussed about to get a favourite working. Some ROMs also require sound effects to be downloaded and installed separately.
Arcade games play particularly well. They look brilliant on the screen, sound fantastic, and are a perfect match for the interface.
Classic home computers can be a bit trickier, including my favourite, the Amstrad CPC 6128. Many games that you can play on a joystick require a keyboard to start them. The right flipper button works as Enter, so it's easy enough to start games like Batman that use the Enter key. You can just plug a Raspberry Pi (or any USB) keyboard into the back of the unit, but it means taking the back off the cabinet, and you have the clutter of a keyboard lying around. Part of the appeal of having an arcade cabinet is that everything is contained within it.
Fortunately, there is a virtual keyboard you can use for the Amstrad emulator (Caprice32), but it took some trial and error for me to get it working. First, I had to add:
input_libretro_device_p1 = "513"
to \\retropie\configs\amstradcpc\retroarch.cfg, as described here. Then I was able to show the keyboard using Start + B. To activate the joystick with the keyboard, I used Select + Joystick Right. Then I could use the joystick to point to a key on the keyboard, and the A button to select a key. Start + B hides the virtual keyboard again. I don't know why this works, but it does seem to, and I'm documenting it here in case I forget. While I'm at it: Memo to myself – remember to use the on/off button to switch the cabinet on after the power is connected. It doesn't automatically start like Raspberry Pi devices usually do. I thought mine had died when I reconnected it after a long break and nothing happened.
There are several ways to copy the files to Retropie. You can insert a specially formatted USB drive. The easiest approach, I found, was to access \\retropie over the local network and then drag and drop files from my Windows machine. The Retropie interface only shows the emulators for which you've added games.
I recommend you are selective about the games you install. It's better to have 100 games you love, than to have 1,000 unknown games clogging up the menu.
You can customize the screensaver with your own images, by adding pictures to the folder \\retropie\configs\all\emulationstation\slideshow\image. I had to create the folder first, and then change Settings > UI Settings > Screensaver Settings. Set the screensaver behaviour to slideshow, and change the slideshow screensaver settings to enable custom images. The screen is really vibrant, and I'm using it to show magazine covers from Amstrad Action, Input, and Crash. Although, thinking about it, it would make a nice digital photo frame when the cabinet isn't being used for games.
The new 4th edition of Raspberry Pi For Dummies includes a chapter outlining ten of the best add-ons for the Raspberry Pi, including the Picade. Others in the chapter include the Piano HAT, Unicorn HAT, and Flick.
© Sean McManus. All rights reserved.
Visit www.sean.co.uk for free chapters from Sean's coding books (including Mission Python, Scratch Programming in Easy Steps and Coder Academy) and more!
A free 100-page ebook collecting my projects and tutorials for Raspberry Pi, micro:bit, Scratch and Python. Simply join my newsletter to download it.
Web Design in Easy Steps, now in its 7th Edition, shows you how to make effective websites that work on any device.

Power up your Microsoft Excel skills with this powerful pocket-sized book of tips that will save you time and help you learn more from your spreadsheets.
This book, now fully updated for Scratch 3, will take you from the basics of the Scratch language into the depths of its more advanced features. A great way to start programming.
Code a space adventure game in this Python programming book published by No Starch Press.
Discover how to make 3D games, create mazes, build a drum machine, make a game with cartoon animals and more!
![]() Top | Search | Help | Privacy | Access Keys | Contact me
Top | Search | Help | Privacy | Access Keys | Contact me
Home |
Newsletter |
Blog |
Copywriting Services |
Books |
Free book chapters |
Articles |
Music |
Photos |
Games |
Shop |
About