Coding Compendium
A free 100-page ebook collecting my projects and tutorials for Raspberry Pi, micro:bit, Scratch and Python. Simply join my newsletter to download it.
February 2015
Discover how to start home recording synth music on your computer, using the Alesis io4 and Sony Acid Music Studio. By Sean McManus.
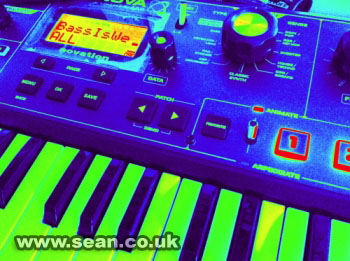 One of my current projects is to record the music I've been writing over the years on the piano and acoustic guitar, giving it a synth-led makeover along the way. I wrote previously about how I got a Novation Mininova synthesizer, which offers high quality sounds in a compact package. I also have a Yahama mini keyboard from the 80s, a Yamaha home keyboard from the 90s, and a Casio home keyboard from the 00s.
Over the last few months, I've been using them separately and together to record new music on my Windows-based computer, so I thought I'd share my experiences.
It's easy to get started with home recording, as I hope this article will show!
UPDATE: You can watch the video to my song Broken Shell below. Find this song on my album Artificial here.
The first challenge was to get everything connected up, or at least to connect the keyboards to the computer. There are two different approaches to this:
For the MIDI connection, I used the Voyetra USB Music Studio Kit, which includes a cable to connect MIDI to USB. This product appears to be discontinued now, but cheap MIDI to USB cables are available.
For the audio, I started off by just recording into the mic input on my PC, but that was limited in a couple of ways. Firstly, it gave me relatively limited control and information about the volumes going into the PC, and secondly it only enabled me to record one instrument at a time, and involved a lot of plugging and unplugging to switch keyboards. When I got a microphone that required phantom power (that is, electricity to be fed up its cable), I needed to get an interface to sit between the computer and the microphone. The upside was that it could sit between my computer and my synths and give me more granular control over recording them too.
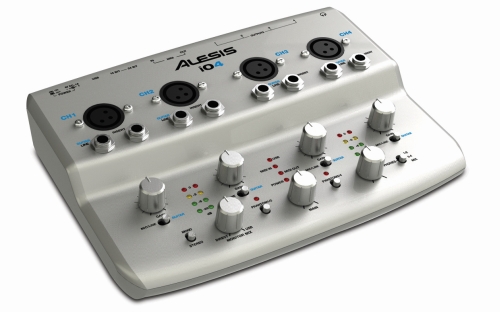
The Alesis io4 audio interface
The audio interface I chose was the Alesis io4. It has four mono channels for input, so you can connect four microphones, or two stereo synths, simultaneously. The dials on it enable you to adjust the gain, so you can ensure that you record at a sensible level and don't push the volumes to a level where the sound distorts. This is particularly useful because some of the synth sounds come through "louder" than others, so you need to adjust it whenever you change the synth voice.
For the output, I connected the audio interface to my hi-fi system, so the synths and computer backing now play back through my hi-fi, giving a much richer sound than I had with my PC speakers.
My previous audio recording experience was limited to tinkering with four-track tape recorders at school, and recording with my home hi-fi. There were a few things that were hard for me to work out on the io4: it wasn't clear that the inputs were mono, for example. Although with hindsight it seems obvious that they would be (because you would want to be able to control the left and right channel independently), I spent some time trying to work out why one channel wasn't coming through. Getting the right combination of cables to connect my synths to it took several trips to Maplin too, given that the synths output through one socket (of one of two sizes), and the io4 takes their feed via two sockets.
Once it was set up, it was trouble-free, and now I can easily plug in synths, the iPad and other instruments, adjust the sound levels, and record on the PC.
The digital audio workstation (DAW) I'm using is called Sony Acid Music Studio. There are others out there that are more widely used (Ableton Live, Cubase and Reason are the three that feature regularly in the music technology press).
Before buying Acid, I downloaded a trial version of FL Studio, a popular home recording program. I thought it might be a good starting point, and I did get some things working with it. I found it hard to navigate, though, and didn't find the help intuitive, so I emailed to ask for the PDF manual. I was told that the manual was only available to people who bought the product. That struck me as incredibly stupid, because the product was already limited (the sound dropped at random intervals), so withholding the manual as an upsell was unnecessary and stopped me from taking the product any further.
I chose Acid on the strength of its reviews, and partly on price. It's a product designed for home users (there is a Pro version if you find it too limited), and it's priced accordingly at between £20 and £50, depending on which version you get. I have since got a copy of Cubase, which came when I bought my audio interface. However, it's easy to get distracted messing around with software. My advice would be to pick one (any one) and stick with it. You'll get much more out of trying to master one application than tinkering with lots of them. With the music I've been doing, I haven't really hit significant limitations with Acid yet, although I can see I might be prompted to upgrade for easier sample management.
Screenshot of Sony Acid Music Studio
The hardest part of getting started was just to understand the screen layout, probably because I hadn't used any workstations before. I expect there are lots of similarities between them, so those who have dabbled with similar applications in the past might find it immediately intuitive.
The layout is:
You use the tools at the top of the screen to edit the tracks. For audio tracks, you can cut and paste recordings, move them around the timeline, fade them in and out. For the MIDI tracks, you can take it down to the note level and change the notes played or timings. A virtual piano that runs vertically up the screen helps you to understand which notes are being triggered at each point.
For soft synths, I've found Computer Music magazine is a good resource. Most issues include some to download.
I've been posting music on SoundCloud, and I've found that valuable in several ways. Most obviously, it enables you to share the music on social platforms, so you can make it easy for friends to listen to it. I've also found a few people that I don't know have discovered my music and left feedback, which is a great experience. It's good to reach new people with the music, especially if they like it. Most of the listeners so far, though, are probably people I've driven there through my other social networks.
One strength of SoundCloud is that it enables you to get feedback on your music too. When you're recording music you spend so long listening to it that it's hard to stay objective and sometimes ideas slip through that impartial listeners would say don't work. I've had useful feedback on a few things that I've been able to easily fix, that have made the pieces better.
You can use the player below to hear the music I've uploaded so far. If you're using SoundCloud, please follow me at https://soundcloud.com/seancouk. You can also hear my music and catch up with more of my adventures in modern recording on my site here.
(The title of this post is borrowed from the second album by The Buggles, Adventures In Modern Recording,
Listen to my music and find more articles about home recording here.
For updates, follow me on Twitter.
© Sean McManus. All rights reserved.
Visit www.sean.co.uk for free chapters from Sean's coding books (including Mission Python, Scratch Programming in Easy Steps and Coder Academy) and more!
A free 100-page ebook collecting my projects and tutorials for Raspberry Pi, micro:bit, Scratch and Python. Simply join my newsletter to download it.
Web Design in Easy Steps, now in its 7th Edition, shows you how to make effective websites that work on any device.
Power up your Microsoft Excel skills with this powerful pocket-sized book of tips that will save you time and help you learn more from your spreadsheets.
This book, now fully updated for Scratch 3, will take you from the basics of the Scratch language into the depths of its more advanced features. A great way to start programming.
Code a space adventure game in this Python programming book published by No Starch Press.
Discover how to make 3D games, create mazes, build a drum machine, make a game with cartoon animals and more!
![]() Top | Search | Help | Privacy | Access Keys | Contact me
Top | Search | Help | Privacy | Access Keys | Contact me
Home |
Newsletter |
Blog |
Copywriting Services |
Books |
Free book chapters |
Articles |
Music |
Photos |
Games |
Shop |
About